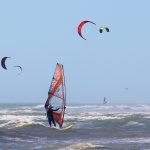
Although it may appear difficult, kitesurfing is actually quite easy to pick up. Those who have previous experience with power kites and other board sports, such as skateboarding, wakeboarding, or snowboarding, will only need a short amount of time to learn the basics.
A standard kitesurfing course consists of three days, each four hours long. After completing a course like this, beginners should be able to ride with confidence.
However, to become more proficient, it is recommended to get as much practice as possible, especially when it comes to riding against the wind.
Doing so will allow riders to avoid any potential hazards and make it back to their starting point if necessary.
How the kite bar works
- The kite bar fulfills several functions during the kiteboarding session.
- It can rotate the kite in the desired direction, by twisting one or the other tip. The tip will act as a ‘break’ slowing the involved wing side, making the kite turn in the desired way.
- It can change the angle of attack of the kite, regulating the power generated (About this topic check the cases when the kite can stall due to excessive angle of attack here).
- Together with the lines and the eventual bridle system, the kite bar connects the rider to the kite and transfers the forces from the kite to the rider to obtain propulsion.
- The kite bar parts can be roughly represented as follows, with some slight deviation from brand to brand:
- Chicken Loop: it connects the harness hook to the depower line and it can be detached or opened to depower the kite in case of emergency.
- Chicken Loop Finger: it avoids the Chicken Loop to slip out of the harness hook.
- Emergency line ring connector: it provides the connection for the kite leash to the emergency line.
- Quick Release: the mechanism that can be activated by pushing or pulling it and will instantly cut the power from the kite by opening or dethatching the Chicken Loop from the depower line. It will leave the kiter connected to the emergency line only (the only line holding the tension), while the bar slides towards the kite leaving the rest of the lines loose (you can see that here).
- Emergency line: it connects the kite leash to a front line (4-line bars) or to the fifth line (5-line bars), to achieve the kite’s full depower by foiling it.
- Lines Winding Posts: the end of the steering bar with a shaped concavity to orderly wrap the lines when not in use.
- Floaters: soft rubber or foam elements that keep the bar floating and protect the rider from directly being in touch with the lines, when in tension.
- The depower mainline: connects the rider to the front lines and allows the bar to slide along it. This gives the possibility to change of angle of attack of the kite, by adjusting the ratio between the length of the front and back lines.
- The Pre-line: normally a rubber or plastic pipe that lets the line be taken with better comfort during the kite launch from the water, preventing the kiter from directly touching the line and getting injured by sudden tensions on it.
- The color-coded Kite Control Bar: lets the rider steer the kite in the desired direction and power-depower the kite according to its position along the depower main line. The color code helps to know where the left hand should be positioned, very useful after complex tricks or after losing the grab from the bar.
- The Stopper Ball: it lets the rider adjust to a minimum power level when the bar is not held in the hands (his element might not be present on all kitesurf bars).
- The Depower Trim Adjustment: it is used to adjust the power of the kite. Similar to the movement of the kite bar along the depower line, it changes the length ratio between the front and back lines, affecting the kite’s angle of attack on the wind. This device provides a fixed adjustment to match the wind conditions to avoid extreme positions of the bar along the depower line. It helps to minimize or maximize the kite power according to the needs.
- The Back Lines: they are attached close to the tips of the kite and are responsible for the direction and depower changes.
- The Y Connector: it connects the front lines to the main depower line. It can vary in its position from very close to the depower trim to very close to the kite, the two cases are referred to as low Y and high Y line setup. This depends on the kite design and shape and it is mostly a choice of a single kite brand.
- The Front Lines: they normally take a bigger part of the load from the kite and they tend to be the ones more subject to elongation after long periods of use or excessive tensions. The ratio between them and the back lines needs to be checked to assure the correct kite trimming.
The three levels of safety in modern kitesurfing bars
There is a sequence of three actions you can perform in case of danger or control loss. These are:
- Release the bar (let go completely of the bar out of your hands).
- Activate the quick release on the depower line.
- Activate the safety release of the kite leash.
The two added levels of safety
Some instructors and kite school standards nowadays refer to the five levels of safety in kitesurfing. Even though they are not directly related to the kite bar, they are still worth mentioning.
Cutting the kite lines is the preferred option. There are two options for escaping a kite gone out of control. The first is to use a safety kitesurf hook knife, which will cut the kite lines. The second option is to try to get untangled from the lines.
The next step is to release the harness. This might sound strange, but the only time it would be applicable is when you can’t use any of the systems and you’re completely out of control.
An example of this would be if you were surfing big waves and got caught in the “washing machine”–surrounded by water going in different directions–and the only way to get out of the situation is to release the harness. However, this seems more theoretical than realistic.
5-step guide to fast-track your kitesurf progression
1) Learn to fly a trainer kite
A trainer kite is a small 2 to 3-meter traction kite that will allow you to safely learn the basics of kite flying before you hit the water. It’s an excellent way to learn about the wind window and the power zone, which you need to understand for kitesurfing.
A trainer kite can help teach you how to control a kite before you get into the water, which is essential for kitesurfing. You can learn about the wind window and the power zone, which are both important for kitesurfing.
Kites with two or four lines are more common, but there are some kites with three lines. The third line on these kites is typically used for safety. A kite with an area of three square meters is ideal, but you should be careful with kites of this size in very strong winds, as they can lift you off your feet.
If you learn the basics of kite flying on a smaller kite, you’ll be able to save time and money when you take kitesurfing lessons. You can also use the smaller kite later for other activities, or lend it to friends.
2) Dig out your old skateboard
There are many similarities between boardsports, so if you are good at wakeboarding, skateboarding, surfing, or snowboarding, you will be more comfortable on a kiteboard.
Being able to focus on flying the kite rather than keeping your balance on the board is an advantage.
Wakeboarding is the closest sport to kitesurfing, so if you learn to wakeboard, you will progress faster during kitesurfing lessons.
3) Watch instructional kitesurfing videos
YouTube videos can be helpful in learning how to kitesurf. However, they should not be used as a replacement for professional instruction.
4) Get kitesurfing lessons from a qualified instructor
You shouldn’t miss this step! Lessons from a qualified kitesurf instructor will help you progress quickly and safely. The good news is that if you’ve followed the first three steps in this guide, you’ll need less time for lessons.
It usually takes three days and four hours per day to feel confident enough to ride. An instructor will fix mistakes quickly and stop bad habits from developing.
Kitesurfing can be dangerous if you don’t respect it. Even if you think you can learn on your own, you won’t get the same benefits as taking lessons. Kite schools also have access to better gear.
5) Buy gear adapted for your level and local conditions
When you’re starting out, you’ll crash the kite—everyone does. hone your kite flying skills on a trainer kite; they’re a bit tougher and don’t have an inflatable leading edge.
The kitesurf school’s gear is likely to get beaten up, so it’s a good idea to get lessons before buying your own gear.
If you want to get some gear after your lessons, ask your school if they have any gear for sale that’s been used before. They’ll often give you a good price if you’ve done your course with them.
It’s not worth it to buy brand new gear when you’re just starting out because it’ll just get ruined.
Extra tip
What are the criteria you should use to select a windsurfing school? There are many factors, including wind, location, and training time.
First, determine where you will most likely be kitesurfing 90% of the time.
Although it would be nice to go on kitesurfing trips to different locations frequently, most of us can’t and have to kitesurf near where we live.
Although it may be tempting to learn in ideal conditions, it is more beneficial to learn in conditions similar to where you will be kiting regularly.
If you learn in flat, waist-deep water, you may be able to progress more quickly, but you will not be able to do everything you were doing in those conditions when you return to the rougher conditions of your local spot.
This can lead to frustration and many people give up before they start. If your local spot is a flat, waist-deep lagoon, that’s perfect, but why would you take kitesurfing lessons anywhere else?
The International Kitesurfing Organisation (IKO) is in charge of kitesurfing instruction at an international level. Any school that is associated with the IKO must have insurance and follow the safety and teaching standards set by the IKO.
If you are uncertain about a school or instructor, you can check if they are registered on the IKO website. Schools and instructors that are registered will be listed on the website for public viewing.
Many countries have a national-level body that also keeps a list of registered schools and instructors.
The schools that are affiliated with the national bodies have to meet the same standards as the IKO. This means that the teaching methods, insurance, and equipment are up to date. However, this does not mean that the schools that are not affiliated are not good.
Many of them have valid reasons for not affiliating. But this can help you determine which schools are legitimate and which are not.
If you follow these guidelines, you can start to eliminate some options for kitesurfing lessons. This will help you choose a place that is safe, quick to learn, and enjoyable. It will also give you a better chance of progressing when you return home.