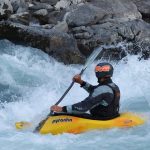
If you’re a kayaker, learning how to roll your kayak is an essential skill that can save your life in rough waters. Rolling a kayak involves using your body and paddle to right yourself when you capsize.
In this article, we’ll provide step-by-step instructions on how to roll a kayak, as well as tips for practicing and perfecting this maneuver.
Whether you’re a beginner or an experienced kayaker, our guide will help you master this important technique and boost your confidence on the water…
How to Roll a Kayak
If you’re not able to handle things, you’ll likely find yourself in a difficult situation sooner rather than later. All kayakers we’re familiar with can roll up every time, apart from those using outdated foldable kayaks and regular sit-on-top models.
Rolling is necessary. Without a dependable list, you will likely not be able to access many areas on a regular basis. Even well-known bodies of water can create issues if the environment fluctuates without warning, like when the wind picks up when you’re out in it.
Without a reliable roll, you may have a disaster. Even a person with expertise in guiding is not always able to do a deep-sea rescue immediately. If you take an unplanned dip in a cave or the surf zone, or if a group of people find themselves in the water simultaneously, you might not be pulled out of the water until you’ve been driven against a cliff or you’ve become too chilled to climb onto your kayak.
Rolling is easy. It is not necessary to have extra strength or exceptional coordination skills to turn over a kayak; what is necessary is the same ability that is required to maneuver a car into a parking spot. Kayakers who ride waves and kayakers who perform tricks are continually flipping their vessels, and you can do it as well.
If you possess a powerful hip rotation, it requires very little effort to roll.
There’s no reason to wait until you’ve perfected all other kayaking techniques before learning how to roll. It’s much simpler to acquire the ability to perform support strokes if you have already acquired the skill of rolling.
Where & how to learn
If you reside in a region with a mild temperature, an indoor swimming pool is the optimal spot for learning. It is possible to gain knowledge while you are spending time at the beach or out on the water.
These pages could be used to self-teach, but having an instructor is the most straightforward solution to learning. Additionally, an unskilled helper could assist but having an instructor is still preferable. If you have a skilled teacher, you should be capable of mastering the skill in two one-and-a-half-hour lessons.
It may require four appointments if you are uneasy about submerging your head in the water.
It is simpler to execute a roll maneuver in a smaller sea kayak than in any larger vessel. If a young person has difficulty mastering the skill of rolling in a kayak, it may be due to the kayak being excessively broad. It is likely simpler to master in a larger seventeen foot sea kayak than in a tiny eight foot playboat.
During the roll of a playboat, it will rotate in the lateral plane when desired for it to remain still; additionally, if you lean a considerable amount backwards when rolling a smaller playboat, it will attempt to tip in the vertical direction.
A dive mask can be beneficial for the student if used from the beginning. Later on, many people like to don a nose clip while doing rolls, but you can just as effectively exhale steadily through your nose while submerged in water.
If your paddle shaft is a cylindrical shape and does not have a different shape where you grip it, it is affordable and simple to install an indexing handle so you can recognize the tilt of your paddle blades without even having to look.
Helper in a swimming pool. Clear warm water, waist deep, is ideal. Your assistant is next to you, and while you’re beginning to learn they can assist you by holding the paddle to make sure the blade stays on the water. (S)he can also roll you back up if necessary.
Someone who is assisting you does not need to be an expert kayaker, but it will be more helpful if they understand what you are attempting to do. One ought to give him/her an activity that is safe and not overly strenuous, but take note in case the kayaker is burly and attempts to use physical strength to compensate for any lack of skill.
On occasion, helpers may need to jump up in the air in order to avoid having their lower limbs hacked by a paddle cutter.
Helper at sea. If you are self-assured and athletic, you can acquire the ability to canoe in the ocean. Both you and your assistant need to be in kayaks; it would be simpler if your helper is paddling something different from a sea kayak.
Prior to going kayaking, do a training in shallow water of the bow rescue, paddle rescue, side rescue, and TX-rescue / T-rescue.
If you’re trying to master hip snapping technique while out at sea, use the paddle rescue method. Position the two kayaks side-by-side with a spacing of approximately two feet between them. Place your paddle in front of you to form a connection between the kayaks. Employ the paddle in the same fashion as you would a guardrail of a swimming pool.
Practice at sea. Practice in the sea every time you go out. It’s not worth it to study if you can only swim in a pool, wearing a bathing suit and noseplug, given a two minute heads up.
If it is hard to transfer your proficiency in swimming-pool rolling to the ocean, you can try a calmer form of surfing on a beach appropriate for learning. After hauling your kayak up the beach five times due to it becoming flooded, you’ll have all the determination needed to stay in your kayak and successfully roll the next time around.
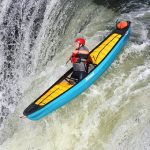
If you overturn while surfing a wave, you must go with the wave’s flow instead of against it. Frequently, you merely need to arrange your paddle so that you are positioned to move with the wave and the wave will bring you upright again. Sometimes you must delay beginning your roll for five to ten seconds to ensure the wave has finished passing by.
If a member of your kayaking squad isn’t eager to practice rolling in the ocean, it’s possibly because they would rather participate in the training in a toasty warm pool (completely understandable!) or reconsider their clothing choices when kayaking. If it is not possible to erase their hesitancy, they will be an impediment on a complex journey. A voyage can be labeled as “advanced” if it consists of inexperienced or beginner kayakers.
The basics of rolling
Each roll begins with one paddle blade gliding over the water and then plunging in a downwards direction. With some training, you can learn to roll only with the sweep movement or just with the strike phase, which is especially beneficial for rolling a small kayak.
Only one blade is responsible for work, and we will refer to it as the active blade. Begin along the outside of the kayak close to one end (the START POSITION). Glide above the surface, away from the kayak. It functions similarly to a water ski, making your kayak tilt onto its side and bringing your torso partially out of the water so your head is just beneath the surface.
Reach out with the active blade as far as possible away from the side of the kayak and push it down in a vertical direction at the STRIKE POSITION. The water provides the aid necessary for you to stay upright due to its resistance to your downward force.
Timing is essential just as it is with the backing strokes we spoke of before – that is the way in which the strike functions. When you begin your paddle stroke, the paddle blade will naturally start to dip.
Once the depth reaches 18 inches or less, it is not as supportive. It happens in an instant that the edge reaches its destination, so you must make the most of the very limited time you possess. To accomplish this, one should use a hip flick.
Step-by-step Guide On How To Roll your Kayak
Step 1: Find A Safe Location
When attempting to Eskimo roll for the first occasion, it is advantageous to perform the maneuver in serene water, free of waves, hindrances, and currents. A swimming pool can be ideal.