Greetings fellow water enthusiasts!
Are you new to kayaking and wondering how to paddle like a pro? Or maybe you’re a seasoned kayaker looking to perfect your technique? Either way, you’ve come to the right place.
Paddling a kayak is not only a great way to explore the great outdoors, but it’s also a fantastic workout for your arms, back, and core. However, getting the hang of proper paddling technique can take some practice.
But fear not, we’ve got you covered with this comprehensive guide on how to paddle a kayak like a boss. From the correct grip to the perfect stroke, we’ll take you through all the steps you need to know to become a confident and efficient paddler.
So, sit back, grab a paddle (or at least imagine you have one), and get ready to take your kayaking skills to the next level. Trust us, it’ll be worth the read. Let’s dive in!
The Paddler’s Box – how to paddle a kayak
The position of your hands on the paddle and your shoulders will determine how much power you have when paddling.
The ideal paddling position is one in which you can trace a line from your hands, up your arms and shoulders, across your chest, and back to the paddle.
The shape of the box should be roughly square, hence the name.
Your paddler’s box should move with you and stay the same size, staying within the imaginary lines no matter which way the paddle is going or how much your upper body is turning.
You’ll likely have to check on your paddler’s progress multiple times throughout the day at first. Once they get used to it and it becomes muscle memory, your hands will automatically go to the right position.
Know your paddle blades
Each paddle blade has two sides, called the power face and the back face. The power face is the side of the blade that catches the water during the stroke.
Some have flat ends, while others have blunt ends; some are curved on one side and flat on the other, and some are symmetrical. The ends of kayak paddle blades can vary, with some being flat, others being blunt, and some being curved on one side and flat on the other.
Some paddle blades are symmetrical while others are not.
- Construction materials used for the blades include plastic, fiberglass, aluminum, and – in the case of high-performance paddles – carbon fiber.
- Most kayak paddles feature asymmetrical blades, with one edge shorter than the other. Unlike their oval-shaped counterparts, they help the paddle track straight through the water.
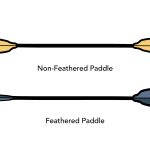
- Feathering or offset – the angle between the blades – reduces the top blade’s wind resistance, but learning how to paddle is generally easier with matched, no-offset blades.
- The high or low angle at which the blade hits the water is also a factor. High-angle paddlers will benefit from wide, short blades; low-angle paddlers require longer, more narrow blades.
- Are the blades matched (parallel) or feathered (at an angle to one another)? It’s easier to learn with matched blades. If yours are feathered, look at the shaft’s center for a push-button and holes circling the shaft. Press the button and rotate the two shaft halves until the blades are parallel.
The blades of the paddle are asymmetrical if one side is shorter than the other. This helps the paddle track straight instead of spinning when pulled through the water. If the blades are an oval shape, then they are symmetrical. You can learn to paddle with either blade type.
The blades on a rowing oar are typically slightly concave, or curved. This shape allows the rower to grab more water for a more powerful stroke.
How to Hold Your Paddle
It is important to hold your paddle correctly and to have a paddle that is the correct length in order to paddle efficiently and without fatigue. If you are unsure about the correct length for your paddle, ask your guide or paddle shop, or read How to Choose a Kayak Paddle.
Holding a paddle the right way involves four things:
- Knowing what type of paddle blades you have
- Orienting the blades properly
- Adjusting where you grip the shaft
- Relaxing your hands on the paddle shaft
To learn how to paddle, the first step is to grab your paddle and place your hands on the shaft as you would if you were going to start paddling. Make sure to make the following adjustments:
- The hands are at about shoulder-width apart – or slightly wider – with the knuckles facing up as you’re holding the paddle.
- The hands are at an equal distance from the blade heads – at about 6 inches on each side.
- The elbows are making a 90-degree angle with the kayak paddle lifted on top of your head. Use this to check your “paddler’s box.”
- The blades are oriented properly and perpendicular to the surface. If they’re asymmetrical, the shorter edge should be at the bottom.
- The grip is secure but relaxed. The “power hand” will have a firmer grip, but again, not too tight. The other should maintain a relatively loose, O-shaped grip.
Seating Position & Paddling Posture
A beginner’s forgetfulness of proper posture and sitting position is often due to incorrect adjustment of the kayak outfitting.
- Sit up straight – shoulders relaxed and chest open – and avoid slouching. Opt for a seat with adjustable back support but don’t lean against it as if you’re lounging at the beach.
- Rest your feet against the footpegs, with your legs outstretched – but engaged. Maintaining a slight bend allows you to use your legs as leverage more efficiently.
- Your upper thighs – not your knees – should rest against the thigh braces. You’ll remain “connected” to the kayak while also staying comfortable.
The Anatomy of a Kayak Paddle Stroke
catch, stroke and release. A paddle stroke can be divided into three sections: catch, stroke, and release.
- Wind-Up Phase – Wind-up refers to the positioning of your body throughout the stroke. The torso should wind in the initial stroke direction. Keep the lower arm nearly straight; the upper arm should be bent slightly with the wrist at face level.
- Catch Phase – This phase refers to when the blade enters the water. Unwinding your torso pulls the paddle blade through the water – but not with your arm. The core muscles should do the bulk of the work.
- Unwind or Recovery Phase – Recovery happens at the end; proper form sets you up for successful execution of the following stroke. One blade lifts out of the water – your elbow guides the movement – while the other moves down, and you wind up for the next stroke.
Every brush stroke should be done in one smooth, continuous motion with even pressure. You may have to adjust the stages of the stroke depending on the type of stroke you are doing, but the overall motion should remain the same.
Kayak Paddling Techniques For Beginners
Forward Stroke
The following text is about the forward stroke being the most basic kayaking paddling technique. It points out that this is the technique you will use most often, and therefore, it should be something you learn and focus on.
If you want to be a good paddler, it’s important to use your torso muscles (core and back) rather than just your arms.
Here’s how to perform a basic forward stroke:
- Sit up and keep your eyes on the horizon.
- Wind your torso and anchor the paddle blade in the water near your feet. It should remain in a near-vertical position and fully submerged throughout the stroke.
- Engage your core and back and start pulling the paddle toward you along the side of the hull to propel the kayak forward. Push against the shaft with your other hand.
- As the blade reaches your hip, slice it out of the water.
- Rotate your body and dip the out-of-water blade into the water to repeat the motion on the other side.
catch, drive, and exit. Ensure that you are holding the paddle correctly. You can now proceed with the three phases of the forward stroke: catch, drive, and exit.
- The catch phase: Wind your torso and immerse your blade fully on one side of the boat next to your feet.
- The power phase: Rotate your torso as the blade moves behind you. Follow the in-water blade with your eyes and your torso will follow. Focus, too, on pushing against the shaft with your upper hand as you move.
- The release phase: When your hand reaches just behind your hip, “slice” the blade out of the water.
- To repeat, you simply immerse the out-of-water blade next to your feet. (Your torso will already be wound correctly.)
Technique Tips:
- Focus on using your strong core muscles to power your stroke rather than the weaker muscles of your arms. Your muscles will tire quickly if you’re not using the proper technique. You’ll also be more prone to injury.
- Maintain the blade in a near-vertical orientation and at a consistent (full) level of immersion. You’ll track straighter and move faster.
- Keep as upright as possible. You’ll maintain balance and gain efficiency.
- Think about the paddler’s box throughout the stroke. That helps align your body correctly for every phase of the stroke.
Sweep Stroke
That will require a little more effort. If you want to turn your kayak, you will need to put in more effort than simply paddling in a straight line.
That’s a whole different can of worms.
In my opinion, every paddler should be able to steer without relying on the boat’s rudder. The paddle is the most basic tool they have, so they should know how to use it to stay safe on the water.
If you stroke the oar on the same side of the boat forward multiple times, you will see the boat gradually turn in the other direction. Turning the boat using the sweep stroke on the side of the boat is more efficient.
- The catch phase: Extend your arms forward and immerse the blade near your feet to begin your sweep. Begin on the opposite side of the boat from the direction you want to turn
- The turn phase: Sweep the blade in a wide arc toward the stern of the boat. Put some power into your body’s rotation to optimize the stroke, especially after the paddle has passed the cockpit.
- The release phase: When the blade approaches the hull behind your cockpit, finish the stroke by slicing the blade out of the water.
- The result should be a gradual arcing turn with little loss of momentum. You can repeat the sweep stroke if needed, or resume your forward stroke.
Technique Tip:
- A wide sweep is important, so picture the hands of a clock in the water and try to touch all of the clock numbers along your arc.
- One way to correct your course is to drop the blade in the water on one side or the other; simple as that.
The other way to learn how to do a forward sweep stroke is by doing it yourself.
- Extend your arm and drop one blade – right one to go left and left one to go right – into the water as far forward as you can comfortably reach. Start the sweep with the blade near your toes.
- Sweep the blade in a big, wide arc – as if you were drawing a large letter “C” – by pulling it toward you. Rotate your torso and keep your arm straight throughout the motion.
- Continue pulling the blade toward the back until it reaches the stern about 10 inches from the hull.
Remove your hand from the water to complete the stroke.
Your ‘yak should make a gradual turn, using sweep strokes if necessary to maintain momentum. Alternatively, you can continue with regular forward strokes.
To do a reverse sweep stroke, enter the blade into the water at the back of the kayak and sweep it towards your toes, stopping once it reaches the front of the kayak.
Reverse Stroke
In some situations, you may need to kayak backwards to get out of a difficult spot. This could be due to a narrow creek that doesn’t allow your kayak to turn around, or perhaps you want to avoid an obstacle in the water.
No matter what, you should learn how to do the reverse stroke before you start going to new areas.
Although it may not be easy, it is possible. You are effectively doing the opposite of the standard forward stroke, going from the back of the boat to the front.
Here’s how to perform a back or reverse stroke:
- Bring the paddle to the back of the kayak and wind your torso in the same direction. Follow the paddle with your eyes if it’s easier; your body will follow.
- Look behind you and, with the blade in the water, pull the paddle toward the bow while keeping it parallel to the hull.
Cut the fish at your feet and then make the same cut on the other side.
paddle on the right side to go left, paddle on the left side to go right To brakes a moving kayak, use the reverse stroke. If the kayak is stopped, the reverse stroke can be used to back the kayak up.
The stroke is the opposite of the forward stroke: paddle on the right side to go left, and paddle on the left side to go right.
- The drop phase: Wind your torso and immerse your blade fully on the side of the boat next to your hip.
- The power phase: Rotate your torso as the blade moves in front of you.
- The release phase: When your paddle blade is even with your feet, “slice” the blade out of the water.
- To repeat, simply immerse the out-of-water blade on the opposite side of the boat next to your hip. (Your torso will already be wound correctly.)
It is just as important to know how to slow down and stop the kayak as it is to know how to paddle it forward.
Since most kayaks don’t come with a “Stop” button or set of brakes, you’ll have to learn how to stop using your paddle.
- If you’re going forward, complete three to four short and forceful back paddle reverse strokes on alternate sides.
- If you’re going backward, complete three to four short and forceful forward strokes on alternate sides.
Paddling in reverse is not something that you will often do, and when you do it will probably not be for very long. Even so, I think it is a good idea to practice it whenever you have the opportunity.
Draw Stroke
To move your boat sideways, use draw strokes. This is helpful if you want to get close to a dock or another boat.
- Rotate your paddle blade so it’s horizontal.
- Reach out with the tip of the blade to touch the water about two feet away, directly on the side of your boat. (Your paddle shaft should be angled steeply.)
- Use your lower hand to pull the blade straight toward you, keeping the tip of the blade immersed in the water during the stroke.
- Stop before the blade hits the side of the boat.
Typically, it takes several draw strokes to complete the drawing, so you can repeat the stroke as needed.
- Rotate the blade 90 degrees, then slice it out of the water sideways.
- Repeat steps 1 through 4 above.
Safety Tip:
If you felt the paddle hit the boat, don’t try to pull it out. This can cause the boat to tip over. Instead, let go of the paddle or relax your body and start over.
More than one draw stroke may be necessary; continue by retrieving your blade and repeating the process as required.
Sculling Stroke
The sculling stroke is a relatively hard kayak stroke technique to master. But once you get a hold of it, it also becomes one of the most powerful – and elegant – ways to move your kayak sideways.
Here’s how to perform a sculling draw:
- Wind your torso to the side, holding the paddle upright – nearly vertical – with the blade in the water. Keep your upper arm high and bent at a 90-degree angle.
- Turn the blade’s power face toward the kayak and feel how it behaves in the water.
- Open up the power face in the sweep’s direction and start moving the paddle back and forth along a short path. Keep the movement continuous and parallel to the hull and the blade fully submerged.
If you angling the kayak correctly and using enough force, it should start moving to the side instead of forwards or backwards.
Carving Turns & Edging Your Kayak
Carving turns can either be done on their own, or as a way to add extra power to other turning methods. This move is very versatile and can be helpful when you need to cancel out the effects of strong winds.
You lean the kayak onto its side so that both rails are in the water, using your paddle as a lever, and then push the top of the paddle blade into the water to pull yourself around. You won’t be able to do a carving turn without tilting your kayak onto its side so that both rails are in the water and using your paddle as a lever.
Push the top of the paddle blade into the water to pull yourself around.
To roll a kayak, you’ll tilt it to one side so it’s on its edge.
You might feel like you will fall over at any second, but you are in control; it is not the same as leaning a bit too far.
Here’s how to edge your kayak:
- Keep your eyes on the horizon; this improves balance and helps maintain a strong posture.
- Push one knee up against the hull while simultaneously shifting the weight to the opposite hip. The curve of the hull will submerge on one side while lifting the other.
- Stay as upright and as close to the center as possible; only the ‘yak should be leaning.
- Hold the edge for a bit and then roll it down by slowly raising the opposite knee.
- Carving essentially means holding the edge and throwing a basic forward stroke into the mix. It’s going to take practice – lots of practice – so don’t expect to nail it on your first try.
A Few More Tips For Beginners
As you work on your kayaking paddling techniques, keep the following in mind:
– The blade of your paddle should be perpendicular to the water surface when you are paddling.
– If your paddle is not perpendicular to the water surface, you will not be able to paddle as efficiently.
– Kayaking is a low-impact activity, so you don’t have to worry about stressing your joints or muscles too much.
– However, if you paddle for long periods of time without taking a break, you may get tired.
– Make sure to take breaks and paddle at a moderate pace to avoid getting too tired.
- Choose The Right Paddle Size – Stand up straight and extend your arm above your head; that’s your target paddle length. Paddlers up to five foot ten will likely need a 220 to 230-centimeter paddle; taller paddlers should go for 230 to 240 centimeters or longer.
- When In Doubt, Take A Lesson – You’ll have a chance to practice basic strokes and rescue techniques, perfect your form, and go over safety rules under the guidance of a certified instructor. Also, asking questions in real-time – while you’re on the water – makes the learning process easier.
- Record Your Paddling Sessions – Whether you like what you see – or not – videos don’t lie. You’ll spot things that need fine-tuning, see what to focus on next, and be objective with yourself. Best of all, you get to see the improvements more clearly when they happen.
- Team Up & Practice With A Friend – I generally advise others against paddling solo; that’s kayaking safety 101. But teaming up with someone has other benefits, too. Your friend can keep an eye on you and point out things that need work – without making you uncomfortable. Plus, it’s fun.
Final Word On How to Paddle a Kayak
There are many reasons why someone might want to take up kayaking, such as exploring new waterways, getting in touch with nature, and burning calories. The first step to taking up this activity is learning how to paddle a kayak.
Make no mistake about it:
Paddling is a skill that takes a long time to master. You will need to put in a lot of practice and work hard to learn all the different strokes.
You have already learned a lot about paddling a kayak and you are well on your way to becoming an expert. It takes time to learn all the skills, but it is worth it in the end.