The main problem homebuilders face when trying to build a feathered kayak paddle is how to attach the feathers.
Most builders buy an adjustable ferrule that allows for different angles of feathering for the paddle, or they build a scarfing jig that allows them to cut the shaft at an angle to give the proper feather. Later, they glue the two pieces together.
There is a third method, which involves twisting a multiple laminates to the feathered angle and holding them in place on a building form while the glue dries. This article describes the third method.
Materials Needed:
- 2 – 1/2″ x 1 1/2″ x 8′ WRC
- 1 – 1/4″ x 1 1/2″ x 8′ ash or other hardwood
- 1 – Bottle of PU Glue or epoxy and wood flour
- 1 – 2″ x 8″ x 8′ for strongback or a building strongback
- 6 – 12″ x 6″ x 3/4″ plywood for forms
- 6 – 1″ x 1″ X 6″ blocks for fastening forms to strongback
- 2 handfuls – 1 1/2″ screws
You should choose laminates made from high-quality wood for this project. I suggest using a softwood and hardwood combo. This means that using a softwood will make the item lighter and using a hardwood will make it more stiff.
The western red cedar is a good softwood to use for this project, and ash is a good hardwood to use. This combo paddle will result in a shaft that weighs around 1 pound 8 ounces, after the shaft is rounded and the blade attachment area is shaped, but before any blades are added.
When cutting the laminates for your project, look for a clear 2×4 with straight grain, which will yield the best results. You only need to clear two 1/2 inch slabs from the 2×4 board, the entire board does not need to be cleared.
For the hardwood, I like to use ash. I use two 4-foot pieces of 1/4-inch by 1-1/2-inch ash and butt joint them in the center of the shaft. This can result in the center of the paddle being slightly weaker, so it’s best to find an 8-foot hardwood piece when you’re shopping.
You will need two slabs of softwood that measure 1/2″ by 1 1/2″ by 8′, and one piece of hardwood that measures 1/4″ by 1 1/2″ by 8′. This will result in a laminated shaft that is 1 1/2″ by 1 1/4″. One and a half inches will be placed perpendicular to the blades while one and a quarter inches will be placed parallel to the blades.
Before gluing the laminates together, sand the surface of each one to create a smooth face.
Set-Up
After the wood is selected, cut and prepared, the next step is to build the mold and forms for the shaft. This is done in two steps: 1. Building the forms, and 2. Mounting the forms to the strongback.
Making the Shaft Forms
First, cut forms out of 3/4″ plywood. These should measure 12″x6″. You will cut an opening in the form for the shaft to slide through so it can be glued. On each form, measure and mark 3″ from the long side and parallel to that side.
This will be your centerline. Draw a line 8 inches from the bottom of the form and another line perpendicular to it. The point where these two lines intersect will become the center of the paddle shaft.
On three of the lines, draw a rectangle with the top 1.5″ long and the vertical sides 1.25″ wide. Center these rectangles on the intersection point.
Draw three opening, each offset to the degree of feathering desired. I suggest 60 degrees as a good default setting if you don’t have a preference. When you take your shaft off of the forms, you will need to account for the possibility that the wood will try to return to its natural shape.
I’ve had cedar and ash shafts with about 5 degrees of springback. Draw a line from the intersection point of the two lines at 65 degrees from the centerline. The goal is to add 5 extra degrees to the 60-degree feather, which will hopefully compensate for any springback.
Draw a line perpendicular to your 65-degree line and then draw a 1.5″ x 1.25″ box around these lines with the top and sides parallel to the new lines.
Cut these rectangles out with an eye to accuracy. Make sure to test each one so that your shaft blank can slide through the hole easily. If they improve now, it will be easier for them later.
Mounting to the Strongback
Once the forms are built, it is time to attach them to the strongback. I screw a 2″x8″x8′ flat and straight piece of lumber to two sawhorses to create a strongback. A strongback that is used to build canoes or kayaks can also be used as a 2×8.
The first step is to draw a centerline down the middle of your strongback. You will align the center of the form to this line. Next, find the center of the strongback and draw a perpendicular line across it.
You need to determine the length of your grip when holding a paddle before you can start mounting blocks. To measure your paddle, grip it as you normally would and then measure from your thumb to your thumb.
The distance between your thumb and your fingers when you grip something with your hand is called the “thumb-to-thumb” grip. This distance is different for everyone, but for the twist to work correctly, it must be less than your thumb-to-thumb grip.
In general, I like to keep a distance of 18 inches between myself and the twist in order to maintain balance and control while paddling.
From the centerline, measure half of your thumb-to-thumb distance minus two inches on each side and draw a line across the strongback. This will be where you mount your center-most forms. My first two forms are mounted 9″ away from the centerline. First, measure and draw lines 15 inches apart.
After you have the form locations drawn out, you will need to add mounting blocks in those areas. The mounting blocks should be screwed onto the strongback on the opposite side of the form location line from the centerline. Your forms will screw into these blocks.
Gluing up the Shaft
Once the forms are attached, it is time to glue the shaft. First, mark the center of all the boards. As you glue the laminates together and slide them into the forms, you must make sure that the centers of the laminates are lined up, and that the center of the laminates align with the center of the form.
You should set out a box of 12 to 18 clamps before you glue. Screw your forms onto the shaft quickly and set to gluing.
Make sure you follow the directions for the type of glue you’re using whether that is epoxy or PU glue. Wear gloves to protect yourself and follow all safety protocols for hazardous materials. After you have coated each surface of your laminates with glue, put them together and align the center lines.
Next, align one end and clamp it tightly.
Getting the shaft onto the Forms
Apply the glue and then work quickly as most glue has a limited working time. It doesn’t hurt to have help during this step. First, slide the shaft with the adhesive through the three forms that are still mounted on the form.
Excess glue that leaks from the shaft can help work as lubrication. If you are having difficulty pushing the shaft through the forms, use a hammer to help. Place the forms that you unscrewed from the strongback onto the shaft when the centerlines align.
Align the forms on the shaft with the marks you made earlier, then twist the shaft until the forms are aligned. Then screw the forms back into place. To check alignment, quickly sight down the centerlines and then start clamping.
Make sure that the laminates are aligned with each other while you are clamping them between the forms. You should try to place at least three clamps between each form. For PU glue, you will need to clamp the pieces tightly together.
For epoxy glue, you should slightly loosen the clamping.
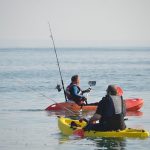
How to Paddle a Kayak: Basic Paddle Strokes