Skip to content

How to Clean a Kayak

    If you’re an avid kayaker, you know how important it is to keep your kayak clean and well-maintained.

    Not only does regular cleaning help to extend the life of your kayak, but it can also prevent the buildup of grime and bacteria that can impact your paddling performance.

    But with so many different materials and types of kayaks available, it can be challenging to know the best techniques and products to use for effective cleaning.

    In this guide, we’ll provide you with a step-by-step approach to cleaning your kayak and offer tips and tricks to keep it in top condition. So, let’s dive in and learn how to keep your kayak looking and performing its best!

    Why Clean a Kayak?

    It is essential to clean your kayak on a regular basis for numerous reasons. Here are the most compelling benefits of cleaning your kayak:

    • Remove saltwater that could cause rust or corrosion to certain components
    • Remove other chemicals or substances that can degrade your kayak
    • Prevent the spread of aquatic invasive species
    • Maximize the life of your kayak by caring for it properly
    • Prevent the accumulation of mold or mildew
    • Avoid insects and small critters making second homes inside your kayak
    • Be excited to get into a clean kayak every time you want to paddle!

    This is by no means an exhaustive list of all the advantages of cleaning a kayak, yet it should serve to motivate you to devote a bit more energy to protecting the money you have invested in one of the top recreational kayaks!

    how to clean the outside of your kayak

    Kayaking is a fun and exhilarating activity that many people enjoy, whether they are experienced paddlers or beginners. One of the most important things to do to ensure that your kayak remains in top condition is to clean it regularly.

    Cleaning the outside of your kayak is especially important because it is exposed to the elements and can accumulate dirt, grime, and other debris over time. We will discuss the best practices for cleaning the outside of your kayak to keep it looking great and performing well.

    Step 1: Gather Your Supplies

    Before you start cleaning your kayak, you will need to gather the necessary supplies. You will need a soft-bristled brush or sponge, a mild detergent, a hose or bucket of water, and a towel. It is important to use a soft-bristled brush or sponge because harsh scrubbing can damage the surface of your kayak.

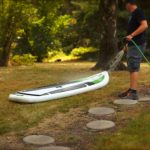
    Step 2: Rinse Your Kayak

    The first step in cleaning the outside of your kayak is to rinse it thoroughly with a hose or bucket of water. This will help to remove any loose dirt or debris that may have accumulated on the surface.

    Step 3: Apply Detergent

    Once your kayak is thoroughly rinsed, apply a mild detergent to the surface using a soft-bristled brush or sponge. Be sure to use a detergent that is safe for use on your kayak, as some cleaners can damage the surface of certain materials. Gently scrub the surface of your kayak, being careful not to apply too much pressure.

    Step 4: Rinse Again

    After you have scrubbed the surface of your kayak with detergent, rinse it thoroughly with a hose or bucket of water. Be sure to rinse away all of the detergent, as any remaining residue can cause damage to the surface of your kayak over time.

    Step 5: Dry Your Kayak

    The final step in cleaning the outside of your kayak is to dry it thoroughly with a towel. Be sure to dry all surfaces, including the hull, deck, and cockpit. Drying your kayak will help to prevent water spots and minimize the risk of mold or mildew growth.

    In conclusion, cleaning the outside of your kayak is an essential part of kayak maintenance. By following these simple steps, you can keep your kayak looking great and performing well for years to come.

    Remember to use a soft-bristled brush or sponge, a mild detergent, and to rinse and dry your kayak thoroughly. By taking good care of your kayak, you can enjoy many more fun-filled paddling adventures in the years ahead.

    can you pressure wash your kayak?

    One question that many kayakers have is whether or not they can pressure wash their kayak. In this part, we will discuss the benefits and drawbacks of pressure washing your kayak and provide some tips to ensure that you do it safely.

    Benefits of Pressure Washing Your Kayak

    Pressure washing your kayak can be an effective way to remove stubborn dirt, grime, and other debris from the surface of your kayak. It can also help to remove algae, mold, and other organisms that can build up over time.

    Pressure washing can save time and energy, especially if you have a large kayak or if it has been heavily soiled.

    Drawbacks of Pressure Washing Your Kayak

    While pressure washing can be an effective way to clean your kayak, it can also have some drawbacks. High-pressure water can damage the surface of your kayak, especially if it is made of softer materials such as plastic or fiberglass.

    Pressure washing can also force water into areas of your kayak where it may not be able to drain, leading to potential damage or mold growth. Additionally, using a pressure washer can be noisy and require additional safety precautions.

    Tips for Pressure Washing Your Kayak Safely

    If you decide to pressure wash your kayak, there are some safety tips to keep in mind. First, make sure to use a low-pressure setting and a wide-angle spray nozzle to avoid damaging the surface of your kayak.

    You should also avoid spraying directly at any openings or areas where water can get trapped. If possible, angle the spray downwards to help the water drain away from your kayak.

    It’s important to note that pressure washing should not be your primary method of cleaning your kayak. A soft-bristled brush or sponge and a mild detergent should be used first to remove any loose debris and to avoid any potential damage to the surface of your kayak. Pressure washing should be reserved for heavily soiled or hard-to-clean areas only.

    In conclusion, pressure washing your kayak can be an effective way to remove stubborn dirt and grime, but it should be done with caution. Always use a low-pressure setting and a wide-angle spray nozzle, and avoid spraying directly at any openings or areas where water can get trapped.

    Additionally, remember to use a soft-bristled brush or sponge and a mild detergent as your primary method of cleaning your kayak. By following these tips, you can keep your kayak looking great and performing well for many years to come.

    how to clean the inside of your kayak

    With frequent use, your kayak can accumulate dirt, grime, and debris on the inside. Not only can this impact your kayaking experience, but it can also lead to unpleasant odors and bacterial growth if not cleaned properly.

    In this section, we will guide you through the process of cleaning the inside of your kayak, step-by-step.

    Step 1: Remove All Items from the Kayak

    Before starting the cleaning process, remove all the items from the kayak, including paddles, life jackets, and any other accessories. This will give you easy access to the inside of the kayak, and also prevent any damage to your belongings.

    Step 2: Vacuum the Interior

    Use a vacuum cleaner with a hose attachment to remove any loose debris, dirt, or sand particles from the interior of the kayak. Ensure that you get into all the nooks and crannies, including the footrests, seat, and storage compartments.

    Step 3: Wipe Down with a Damp Cloth

    After vacuuming, wipe down the entire interior with a damp cloth to remove any remaining dirt or grime. Use a mild soap or a specialized kayak cleaning solution to clean the interior surfaces, including the seat, footrests, and storage compartments. Rinse the cloth frequently to avoid spreading dirt or grime.

    Step 4: Use a Kayak Deodorizer

    If your kayak has a musty or unpleasant odor, use a specialized kayak deodorizer to neutralize the smell. These products are designed to eliminate the bacteria that causes odors, leaving your kayak smelling fresh and clean.

    Step 5: Dry Thoroughly

    After cleaning, allow the interior of the kayak to dry thoroughly before storing or using your kayak.

    How to clean mildew from your kayak

    If you don’t properly care for your kayak, it can become damaged and develop mildew. Mildew is a common problem that can occur when your kayak is exposed to moisture for long periods of time, especially if it is not properly dried and stored.

    We will discuss how to clean mildew from your kayak and prevent it from returning.

    Step 1: Gather Your Supplies

    Before you begin cleaning your kayak, you’ll need to gather a few supplies. You’ll need a bucket, a sponge or soft-bristled brush, mild detergent, vinegar, and a hose. Make sure that the detergent you use is gentle and non-abrasive, as harsh chemicals can damage your kayak.

    Step 2: Remove Dirt and Debris

    Before you can start cleaning mildew, you need to remove any dirt and debris from your kayak. Use a hose to rinse off any loose dirt or sand that may be on your kayak. Then, use a sponge or soft-bristled brush to gently scrub away any stubborn dirt or grime.

    Step 3: Mix Your Cleaning Solution

    Once your kayak is free of dirt and debris, it’s time to mix your cleaning solution. Fill your bucket with warm water and add a small amount of mild detergent. Stir the solution until the detergent is fully dissolved.

    Step 4: Apply Your Cleaning Solution

    Dip your sponge or soft-bristled brush into the cleaning solution and begin scrubbing the affected areas of your kayak. Be sure to scrub gently, as vigorous scrubbing can scratch the surface of your kayak. Let the cleaning solution sit on the mildew for a few minutes to allow it to penetrate.

    Step 5: Rinse Your Kayak

    Once you’ve scrubbed the affected areas, it’s time to rinse your kayak. Use a hose to thoroughly rinse away any remaining cleaning solution. Be sure to rinse the kayak from top to bottom to ensure that all of the cleaning solution is removed.

    Step 6: Apply Vinegar Solution

    To ensure that all mildew is removed, mix a solution of 1 part vinegar to 4 parts water. Apply the solution to the affected areas with a sponge and let it sit for 5-10 minutes before rinsing thoroughly.

    And please do NOT use bleech as many will tell you to do. You are using extreme chemicals that can harm you and nature.

    How Often Should You Clean Your Kayak?

    It is recommended that you take the time to clean your kayak after every time you use it. You need to be practical, but you can still do tiny housekeeping duties daily and other activities that don’t need to occur as often.

    It is strongly recommended that you give your kayak a thorough cleaning before you take it to any new lake, river, or other sort of water body. This action is the most critical measure you can take to stop the chance of introducing a hazardous aquatic invader to that habitat.

    More realistically, here are a few cleaning tasks you can do every time you finish a paddle trip:

    • Drain your kayak completely
    • Give it a quick wipe down
    • Remove all kayaking accessories and allow them to dry completely
    • Open storage hatches to allow them to dry completely
    • Store your kayak in a garage or covered shed to prevent moisture from accumulating inside

    When you are ready to perform a more thorough cleaning process, here are some of the kayak cleaning tasks that you can get away with doing a little less frequently:

    • Fully rinsing the hull and using a sponge to remove accumulations of scum or debris
    • Vacuuming any sand, dirt, or debris out of the cockpit and storage compartments
    • Hosing off the kayak seat to remove any embedded sand or debris
    • Applying a kayak wax to provide an additional layer of weather protection
      • This is only applicable for fiberglass, carbon fiber, and wooden kayaks
    • Repairing or replacing any bungees that are stretched out
    • Repairing or replacing broken toggle-style kayak handles

    Choosing the Right Time to Clean A Kayak

    It is unlikely that you will begin washing your kayak at the darkest part of the night. You should bear in mind a few minor details that will assist you in getting the most out of your efforts.

    When you clean a kayak, it is essential that you give it enough time for all the components to dry out properly. If you intend to relocate your kayak to a temperature-regulated garage or storehouse after washing, this would be less of a problem.

    It is preferable to commence cleaning your kayak at around 10am if it is kept outside. This will ensure that you get the most out of your labor by making sure that your kayak gets a chance to wholly dry during the prime hours of the sunlight.

    It is not advisable to clean your kayak in cloudy or rainy weather; it is better to wait for a clear day so you can take care of kayak maintenance properly.

    4 Critical Benefits Of Waxing A Kayak (Especially A Composite Kayak)

    So now that you have cleaned your kayak inside and outisde, why not wax your kayak in the process.

    The most direct response would be to say that it adds an additional level of security to the kayak’s outer shell.

    Despite this, a composite kayak will pick up additional advantages when it is waxed with kayak wax.

    • Improving a composite hull’s durability and longevity
    • Protecting the composite kayak from harmful UV rays
    • As as a protectant, for composite hulls, against dents and scratches
    • Enhancing the shine and color of a composite hull, especially if your kayak is painted

    Contrary to popular beliefs, waxing your kayak does NOT make it go faster!

    What You’ll Need To Wax A Kayak: Essential Supplies For Cleaning & Waxing 

    Thus, it is clear that using kayak wax is advantageous mainly in terms of composite boats. I hope that all the information provided has convinced you to include waxing as a part of your annual kayak maintenance and upkeep plan.

    It is now the moment to assemble all the necessities, get ready for the job ahead, and begin working.

    On that note, here’s a list of supplies you’ll need if you plan on waxing a kayak:

    • Two microfiber cloths
    • A sponge
    • A bucket
    • A water hose (garden hose) and fresh water supply
    • All-purpose mild soap or boat wash (kayak cleaner)
    • Marine wax (Make sure that it’s suitable for use on composite kayaks.)
    • UV protectant (The 303 Products Aerospace Protectant is a highly recommended option that pretty much acts as a sunscreen for your kayak.)

    If the hull of your kayak is constructed from plastic, you probably don’t have to use marine wax since polyethylene and wax don’t combine effectively. And while you can afford to skip kayak wax, a UV protectant spray is a must-have:

    The ultraviolet rays of the sun can significantly damage your kayak. Applying a layer of protection that blocks out ultraviolet radiation can be beneficial to preserve the luster of your kayak, reduce the fading of its coloring, as well as slow down the deterioration of the boat’s hull caused by lengthy exposure to the sun.

    Composite kayaks will benefit from the application of marine-grade wax, followed by spraying a layer of UV protection. In general, it is advisable to employ both measures in order to achieve the most desirable results and highest level of safety.

    Can you figure out which part of taking care of your kayak should always stay the same, no matter what it’s made out of?

    That’s right; the process of cleaning your kayak.

    It could be said that completely cleaning with soap and water after every paddling session is excessive. A daily wash with pure water is all that is necessary. It is recommended that you develop a routine of thoroughly cleaning your yak multiple times throughout the year, particularly for when you will be storing it for a lengthy amount of time. It’s the key to long term kayak protection.

    How To Wax A Kayak: A Step-By-Step Kayak Waxing Guide

    Step 1: Give Your Kayak A Rinse 

    You have gotten a lot of use out of your kayak during this summer, and you can anticipate it will be dependable for many years to come. So, some well-deserved kayak care and maintenance are in order – and it all starts with a thorough rinse:

    Place the item on the grass and use the hose to spray it clean, just like you would when hosing off your vehicle after a fun time driving through the mud.

    The objective is to take off any dirt, mud, sand, salt, and other materials that have been built up and get as much of it off as you can prior to heading on to the subsequent step.

    Step 2: Let It Dry 

    Now that you have cleaned your kayak and eliminated all dirt, it’s essential to wait until it is completely dry. You must ensure that all of the water is removed from the interior and exterior of the kayak before progressing.

    If you’re not looking to be speedy, you can choose to let your hair dry naturally, though the process may take a while. If you’re in a hurry and want to get things done quickly, you can speed up the drying phase by wiping down the outer surface with a towel or other textile.

    If your kayak has a hull made of plastic, then using kayak wax will not be of much help. You don’t need to bother with the subsequent steps involving waxing a kayak and can move right on to applying the UV protectant spray.

    If not, keep reading!

    Step 3: Time To Wax Your Kayak 

    It is time to draw upon the wisdom of Mr Miyagi and copy his technique of Kayak Wax On and Kayak Wax Off.

    All joking aside. At last, we have arrived at the reason why you are here – to wax your kayak. Utilizing your previously prepared microfiber cloth, you will be using it in this step to apply the wax.

    You can apply the product to the kayak by dabbing the cloth in accordance with the specific instructions from the manufacturer. Put a small quantity of wax onto a cloth and start rubbing it into the hull with slow, circular strokes.

    If you chose the marine-grade wax spray, apply it to the kayak first and use a thin and even layer with a microfiber cloth to rub it onto the surface.

    Oh, and here’s a bonus tip:

    The microfiber cloth should be slightly moistened in order to avoid taking in an excessive amount of wax. It is simpler to apply the kayak wax in an even manner in this way.

    Step 4: Allow The Kayak Wax To Dry 

    Once you have completed waxing the entirety of the kayak, let the wax dry, which won’t take too long.

    It is probable that the parts of the kayak that were waxed first have already hardened before the completion of waxing the entire boat. One can easily identify that the product has been completely dried out when it forms a foggy coating on the surface of the kayak. You can also ascertain the progress of things by touching the wax.

    It is crucial that the wax has hardened before proceeding to the subsequent stage.

    Step 5: Polishing It Off 

    Once the kayak wax has had enough time to dry, take a crisp microfiber cloth and begin shining the outside of the kayak.

    Increase the pressure slightly this time when waxing the kayak and use small, circular strokes to cover the hardened wax. Granted, buffing the wax can be a painstaking process depending on the size of your kayak, but the results are worth it:

    The result of your kayak polishing will be a sleek and lustrous look, vibrant hues, and a hull that glows with a brighter overall effect.

    in conclusion

    Keeping your kayak clean and well-maintained is essential for preserving its performance and longevity. Regular cleaning not only prevents the buildup of grime and bacteria but also ensures that your kayak looks great and performs at its best.

    By following the tips and techniques outlined in this guide, you can easily and effectively clean your kayak and keep it in top condition for all your future paddling adventures. Remember to always use the appropriate cleaning products and tools, and to take care when handling your kayak to avoid any damage.

    With a little effort and attention, you can keep your kayak looking and performing like new for years to come!

    Leave a Reply

    Your email address will not be published. Required fields are marked *