Skip to content

How to Add a Rudder to Your Kayak

    To comprehend why a kayak rudder or skeg is so helpful when associated with your kayak, you really need to understand the basics of how kayaks usually maneuver.

    A kayak stays on top of the water surface, and only the bottom part of the boat is submerged.

    When you’re rowing and slicing through the liquid, the front of the vessel has minimal water-resistance, which is commonly referred to as “drag”.

    As the liquid runs alongside the outside of your kayak, the amount of drag felt by the kayak increases, creating more lateral (sideways) pressure on it. The water pushing against the back of the kayak creates more drag, as the fluid resistance is greater in that area.

    And that’s not all!

    When the water glides around the front of the boat, it surrounds it and almost “locks” it in place so it can travel in a straight line. Nevertheless, when it slides away from the back of the boat, there is no secure mechanism in place, making the rear end of the kayak much less stable than the head.

    Taking into account the flow of the current, as well as the waves and gusts of wind that can hit you from an unexpected direction, there is an increased chance of not staying on the intended course.

    The bow of your kayak will remain in its general direction, but the back will wander more, commonly referred to as “weathercocking”.

    Tracking vs. Handling: There is a Difference!

    Tracking refers to how straight the kayak moves. A kayak which glides nicely will typically move in a constant straight path, achieved by its specific shape or by including a rudder or skeg.

    Controlling, which is the same as guiding, has to do with how the kayak can be easily maneuvered, as well as how well it can take sharp turns quickly. It is similar to the “turning radius” of a vehicle – the greater the maneuverability, the more refined the turning ability.

    In order to grasp what is being said, it is important to be aware that kayaks which travel in a straight line are generally not as easy to control, whereas kayaks that are highly agile and can make tight turns normally do not sail in a straight line.

    This is due to the fact that these two features of kayak design essentially counterbalance one another.

    For instance, V-shaped hulls will significantly enhance movement along a straight path, but they will sacrifice primary stability when on flat water and be tougher to manage. However, these boats are specifically made for strong tides and big waves – for instance, when you’re out in the middle of the sea – and to travel long distances.

    Give a comparison between a hull that is designed to be round and one that is designed to turn sharp corners and go faster. Due to not having as much depth for increased water drag, the boat hull is more vulnerable to weathercocking, but it permits the making of more pointed and cleaner turns.

    Which is more important? That’s a question only you can answer, really.

    If you’re looking to have a laid-back paddling experience on calm waters or make a long journey without too much deviation, you should find a kayak that stays on a specified course.

    If you’re looking for an exciting activity such as whitewater kayaking and you need something that will make fast, accurate turns, you should focus mainly on the maneuverability of the kayak when making your purchase.

    Rudders and Skegs Improve BOTH Factors

    The great thing about kayak rudders and skegs is that they offer a boost to both maneuverability and following a straight path.

    A fixed-blade skeg will make it easier for you to stay on course and will make turning slightly more difficult.

    Rudders, unlike other steering mechanisms, provide a better steering experience due to their ability to turn. They can also help the watercraft stay on track.

    The focus is on locating the optimal set-up for your individual kayak– and that’s what we’ll look closer at in the upcoming part.

    Defining Kayak Rudders vs. Kayak Skegs

    Parts of a Kayak Rudder System

    A rudder system typically comes with five parts:

    1. The blade. This is a long, narrow fin-like blade that extends from the stern of your kayak into the water.
    2. The pedals. These are the “steering controls” that allow you to use your feet to twist the blade from side to side. (Note: Some rudder systems use hand-levels, but pedals are the most common steering control.)
    3. The cables. These are cables, typically made from stainless steel, that connect the pedals to the blade.
    4. The mount. This is the hardware that secures the rudder to the stern of your kayak.
    5. The lift lines. These are long loops (typically located near your kayak’s cockpit) that let you stow or deploy your rudder.

    Connecting the rudder system can be a bit tricky. You must ensure that your kayak is either specifically made or able to be adapted for the use of a rudder. But once it’s installed, steering is beautifully easy.

    Press the right foot pedal to rotate the rudder in one direction, and the left foot pedal to turn it in the opposite direction.

    In an instant, you have control of your kayak since the blade pushed into the water guides the water that flows off the back of your boat in the correct path.

    What is a Kayak Skeg?

    A kayak skeg is essentially a “fin” affixed to the bottom of your kayak typically close to the back portion of the hull.

    It does the same job as a rudder—it allows the boat to sail through the water that slides off its hull. But unlike a rudder, it doesn’t turn. This implies that the main goal is to enhance tracking, instead of emphasizing mobility.

    Certain skegs can be adjusted, so you can choose how much of the fin to deploy based on the flow of the water. However, these tend to come built into the kayak. You will likely be attaching a static, non-movable skeg by yourself. They’ll be less versatile, but still provide excellent tracking.

    Skegs can interfere with your handling. They are intended to help you go in a direct path and may impede your turning.

    It is for this reason that skegs are normally seen on kayaks that are good at maneuverability but are difficult to stay in a straight line. Using a skeg on your kayak will maintain its responsive nature while allowing it to travel in a straight line.

    It won’t have much of an effect on your boat’s steering abilities or your capacity to make sharp turns.

    Can You Add a Rudder to Any Kayak?

    In other words, some kayaks are equipped with a rudder and some are not. It is doable to put a rudder on a kayak that was not designed to have one, however, it usually takes more effort.

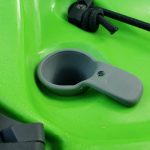
    Kayaks that are ready to use a rudder will have more than one screw hole in the back where the rudder’s holder can connect. The equipment will also feature channels that simplify stringing the cables and hoisting the lines.

    If the kayak is lacking two particular traits, holes will have to be created in the stern for mounting purposes by drilling. It is generally wise to run ropes and hoists on the surface of the kayak.

    This is an issue because if a rudder is installed on a kayak not intended for this purpose, the vessel’s buoyancy may be affected. If you pursue this path, you will require a scheme to patch the openings drilled so your kayak can remain as buoyant as when it was made.

    Perhaps a better inquiry here would be: which kayaks necessitate a rudder?

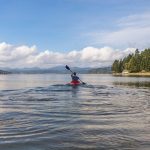
    For long excursions or camping in a kayak, a rudder will be beneficial. Furthermore, sea kayaks used for fishing often have rudders mounted on them to make navigation easier with the current and tides.

    Installing a rudder on your kayak can be beneficial if you frequent a spot that is susceptible to sudden strong winds. However, if you just take a recreational kayak out for short amounts of time when the weather is good, you will probably be fine without a rudder most of the time.

    How to Mount Your Kayak Rudder

    Setting up a kayak rudder can be straightforward if the kayak is made for rudder accessories, however constructing a rudder framework can be hard if the kayak does not have the capability for it.

    For rudder-ready kayaks, the installation process can be as simple as:

    Put the mounting bracket into the holes that have already been drilled.

    Step 2: Insert the rudder into the mounting bracket.

    Attach the lift lines to the rudder mount, then place them into the pre-cut openings.

    Fourth Step: Install the foot pedals in the seat area of the kayak.

    Attach the cables for the rudder to the pedals and the rudder support.

    Just like that, you’re ready to get paddling!

    building a DIY Rudder

    If your exact kayak model does not have a rudder kit available, or if you are feeling adventurous, you can certainly try creating your own rudder. You have a variety of options in regards to what to use for the rudder blade.

    rudder Parts

    This model makes use of commonplace plywood which is covered with a marine-grade lacquer to ensure it is waterproof. This construction requires some rope for the cords, metal L-brackets, a metallic swivel-mount, carabiners for linking, and a bit of ¾-inch PVC piping for the foot pedals.

    mounting the Blade

    Beginning at the back, he placed a bolt through a hole already present from the kayak maker in order to lock the anchor line. He put a yoke end on the head of the bolt to connect it to the upper part of the blade, and then used another bracket to secure the lower side.

    This creates the main axis around which the blade can rotate, and the extent of this rotation is decided by the length of the cables it is linked to. You have the ability to manipulate the degree to which this rudder influences your steering, by adjusting the length of the blade in accordance with your own wishes.

    securing the Steering Lines

    He fastened the blade to the aligned pivot point and linked it up to the upper corners of the blade using bolts, nuts, and washers.

    You must bore two openings on the top boundary of the blade in order to achieve this. Ensure that they are positioned far enough so that the top limits of the brackets are equivalent to the top boundary of the blade when they are fitted.

    The most straightforward approach to complete this task is to place the brackets where they’re needed and then mark through the bracket openings. Then remove the bracket and drill your holes.

    After the brackets were put in place, the kayaker arranged two small loops of rope through the hole in the bracket further away from the paddle. He avoided securing the carabiners directly onto the slots as they often jammed and stopped the blade from functioning properly.

    You can connect one carabiner to each of these tiny rope circles and then direct your rope steering lines toward the cockpit. Think about installing a tiny U-shaped bracket about halfway between the L-brackets and the foot pedals to pass the steering lines through.

    This will ensure that they don’t topple over the edge of the kayak or become entangled among the items you’re stuffing in the rear storage space. Ensure the size of the U-brackets is sufficiently big in order for the rope to have the capacity to move back and forth without being obstructed.

    making Foot Pedals

    For this design, he used a piece of PVC pipe arranged crosswise to the length of the kayak. The position of the rudder is comparable to the kayak’s cockpit and can be easily manipulated by the kayaker’s feet while in the seat of the kayak.

    He put a ScottyMount in the middle of the kayak and created a square shape from PVC and then connected the longer section of PVC to it and fastened it.

    Make a couple of holes in the PVC that lines this extended part, so that the other two clips can be affixed to them. Be sure not to feed the carabiners too far into the PVC tubing so that they can be easily inserted.

    Once you have attached the rope steering lines to the carabiners, you are then ready to attempt to use your home-made kayak rudder.

    in conclusion

    Adding a rudder to your kayak can greatly enhance your paddling experience and help you navigate through challenging water conditions with ease.

    By following the step-by-step instructions outlined in this guide, you can install a rudder on your kayak in no time. Remember to choose the right type of rudder for your kayak and to properly adjust and test it before heading out on the water.

    With a little practice, you’ll be able to steer your kayak like a pro and enjoy your time on the water even more. So go ahead and give it a try!

    Leave a Reply

    Your email address will not be published. Required fields are marked *