How to Kitesurf Upwind – The 4 Things You Need To Know
Board Speed
One of the most common mistakes beginners make is trying to turn upwind as soon as they’ve mastered the water start. With a directly onshore wind, it’s natural to want to sail straight away from the beach.
However, this is a mistake.
But if you turn immediately upwind, your board speed will decrease before it even starts.
Having controllable speed while kitesurfing is key to being able to ride upwind.
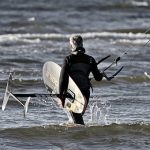
To turn upwind, you need to have the board planing so that only the heel-side edge is in the water.
The first tip is to turn the front of the board towards the kite to head downwind. If you’re starting near the beach, make sure you’re far enough offshore so you have room to go downwind.
Although it may seem daunting at first, you only need to ride a few meters downwind to gain enough speed. Once you have enough speed, you can smoothly carve towards the wind at a controlled speed.
You don’t want your board to be going too fast or it will barely touch the water and you won’t be able to slow down or turn.
You need to be able to dig the heel of your board into the water to resistance the kite’s pull, so you only need to be going at a moderate speed to do this.
Kite Control
This is how you control your board speed.
It is advisable to keep both hands close to the center line of the bar and to keep your arms relaxed. In this position, you will have more control over the sheeting and you will be able to steer the kite with small hand movements.
You can also steer with only one hand on the bar when the skis are in this position.
You want to keep the kite in the middle of the power window, at a 45 degree angle. If it’s too low, it will be in the part of the window with the most power and will pull you downwind. If it’s too high, you will lose speed.
Using the bar, you can control how much power the kite is generating to keep a constant amount of power. You will quickly get a feel for this, adjusting the bar position to account for gusts or lulls.
If there is a decrease in wind, you need to be to operate the kite a little bit up and down to produce additional power.
This process creates additional “apparent” wind on the surface of the kite as it goes up and down. The extra airflow produces more power for the kite. It is exactly like an aircraft wing.
Board Control
you need the heel-side edge of the board to be digging into the water to resist the sideways pull of the kite. The kite will be trying to pull you downwind.
The more “edge” you will need to dig in increases as the wind strength or the board speed increases. This technique is called “edging”.
When the wind is really strong, experienced kiters ride with the board almost vertical and the heel-side dug in with the toe-side up.
If you’re going too fast or have too much power, edging is a good way to control your speed. A sharp turn against the wind with the edge of your board dug in will slow you down, even if the conditions are overpowered.
The board can also be used to generate more speed if you go too far toward the wind, causing a drop in speed, or if the wind drops slightly.
To do this, you turn the board back towards the kite, and ride downwind again until you have enough speed to carve back upwind.
Stance
The correct stance will improve your ability to control both the kite and the board.
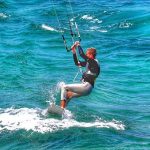
Legs
Keep your front leg almost straight with a slight bend at the knee to absorb waves. Your back leg should be more bent, tucked in behind you with slightly more weight on the back leg.
With your legs in these positions, you can use your back leg to change the direction of the board either up or downwind.
Hips
The “poo-stance” is when someone stands with both legs bent and hips bent, making them look like they are sitting on a toilet. This is a common mistake for beginners, and it looks funny, but it’s not very cool.
Having the kite pulling upwards on the harness hook rather than straight out from it is not only bad for your back, but it also means you aren’t using your full body weight to resist the pull of the kite.
It also makes the harness ride up, which is very uncomfortable.
You should keep your hips almost straight on the up-and-down axis of your body. When instructors say “make love to the kite,” they mean that you should thrust your hips out toward the kite.
Keep your back straight and hips out, so the kite’s pull goes through your harness and down to the board.
The poo-stance refers to the natural defensive position of curling up to avoid being pulled over the front of the board. At first, it takes confidence to overcome this instinct, but once you realize that you have more control, it becomes second nature.
Upper Body
The majority of kitesurfing tricks are performed by controlling the direction your head and shoulders are facing.
In order to change direction while windsurfing, you need to rotate your upper body from the waist in the direction you want to go.
It can be helpful to pick a point further upwind than your desired destination and turn your head and shoulders towards it.
A good way to help make your upper body go upwind is to take your front hand off the bar and let it hang down at your side. This makes your weight go backwards and outwards, which helps the board go upwind.
To be very cool, drop your front hand into the water to make a spray.
Bringing It All Together
To kitesurf upwind effectively, all of the following techniques must be used in tandem – they cannot be done independently from one another. If you’re having trouble succeeding at kitesurfing upwind, it’s likely because one or more of these techniques is being executed wrongly.
If you still have difficulty sailing upwind after watching the video, try to identify the techniques that you are missing.
Don’t worry, becoming proficient will be as easy as learning to walk, but much more exciting!
I hope you found this helpful. If so, please leave a comment below. I would love to hear your feedback.
And if you have any questions please leave those too. If you find the article helpful, please click the “follow” button. You will then receive an email notification whenever I publish a new article. There will be no spam, I promise!
Riding Downwind
Pointing Off the Wind – How To
We’ll keep this short and remember that regardless of what type of kite you’re using, the concept is pretty much the same.
For this explanation, we will assume that we have enough power in our kite to happily ride without needing to work the kite, which was fondly referred to in our early days as Park & Ride Heaven.
If you were to remove all the things that give you a strong advantage, you would be halfway to losing completely. Once you have no advantage and no power, you will be riding off the wind towards the kite.
This is the true release of kiting, and it can be compared to playing football. All you have to do is give up your advantage, and you will be able to go off the wind.
Carve your board into the wind by softening and flexing your knees so your hips and shoulders follow, and lifting the kite slightly. Move your weight onto your back foot to steer the board off the wind.
If you need to bring the kite onboard, be careful not to let it go too high or you’ll end up underneath it with no power.
going downwind, it’s important to keep in mind that many kiteboarders find it simpler to do so while on their toeside edge. For those trying a downwind for the first time, it’s often more comfortable to relax their toeside edge than their heelside edge.
The principal is much the same – if you stop edging and stand more over the board, the kite will pull you off the wind once you’ve released your toeside edge.
The most important part of riding on your toe side is to keep enough weight on your front foot. Many people lean too far back, which causes them to slow down. Video 2 shows this issue in real-time.
It is easier to go downwind with your favored foot forward, regardless of if you are riding heelside or toeside. The main reason is that you feel comfortable with a bit of weight forward. On your “weaker” side, you will lean more to the back.
Now that we have refreshed our knowledge on how to turn downwind, we should think about what often happens next.
Slow Down
-You have lost tension in your lines
-When your board turns towards the kite, you’re moving towards it and as such tension is lost
-The quick fix is to get back on an edge, but that won’t work here
-There are a whole host of options available, depending on the variables at play
When you are maxed out and hanging on for dear life, you can fly downwind. This is because you are balancing the angle you ride off the wind against the power that you have at your disposal. When you have too much power, you can go very fast.
Most of us won’t want to ride with that much power and speed, especially strapless. That’s why we need other methods to help us ride further downwind.
That way, we don’t have to zigzag 100km to get 5 km down the beach. If the wind picks up, we can just follow the kite like we’re wakeboarding.
Many people who ride snowboards have a lot of power and energy, but they will eventually need to take a break.
It’s all about how to keep tension in your lines while making the best possible progress downwind, so that your body doesn’t get tired before you’re finished.
Final words
The main difficulty with kiting is that wind and water conditions are always changing, so you have to be constantly alert and ready to make adjustments. The wind often gusts and lulls unexpectedly, waves and chop come and go, and you have to avoid obstacles like traffic.
It’s never predictable or easy. With the new skills you’ll learn from this, though, you’ll be able to handle whatever nature throws at you next time you’re kiting.