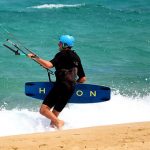
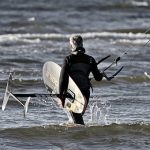
The control bar for kitesurfing is one of the most important pieces of gear concerning safety and control over the power of the kite.
Every kiter knows its functions: it is used in connection with the kite lines to control the steering direction of the kite, the level of power it generates, and how that power is transferred to the rider for propulsion.
This post is quite long. The following subparagraphs are of interest for those who wish to skip any part that they already know.
How the control bar works
The control bar is part of the kite gear that helps adjust the kite’s power by controlling the angle of the kite. The control bar is grabbed with the left hand on the colored part.
The back lines (the ones attached to the end of the leading edge) are connected directly to the bar.
If you bring the bar close to you, it will make the back lines shorter. This, in turn, changes the angle of the kite and gives it more power.
If you move the bar towards you (pulling the bar in) you make the back lines shorter, changing the angle of the kite yet again and increasing the power of the kite. When you move the bar, you change the tension on the back lines, which changes the angle of the kite and how much power it produces.
The front lines of the kite are connected to the depower system in the center of the bar. This system can be used to adjust the length of the front lines and the angle of the kite, which in turn changes the power of the kite.
If you reduce the amount of power in your kite by making the front lines longer, you will have more power overall.
By depowering your kite, you will shorten your lines and lose power.
The back and front lines both affect the angle of the kite, which in turn affects the power or lack thereof. So what’s the difference, and when should you use the back lines or the front lines?
The front lines of the depower system will only be used for adjusting the power of the kite when needed. For example, if you are about to start kiting and the wind is too strong, you can adjust the power of your kite (depowering it) by making your front lines shorter.
Another example is if you are kiting and suddenly the wind drops and you need more power to continue kiting, you can release your front lines to give more power to the kite.
Although the back lines are connected directly to each side of the bar, they are not used as frequently as the front lines.
The front lines are mainly used to control the kite by constantly adjusting the angle. It is very important to be focused and attentive when learning about the safety systems.
How the kite bar works
The kite bar is used to help the kiteboarder control the kite during the session.
It can rotate the kite in the desired direction, by twisting the tip of the kite. The tip will act as a ‘break’ slowing the involved wing side, making the kite turn in the desired way.
The angle of attack can be changed by the kite, regulating the power generated.
The kite bar is what connects the rider to the kite and allows the rider to be pulled by the kite.
- Chicken Loop: it connects the harness hook to the depower line and it can be detached or opened to depower the kite in case of emergency.
- Chicken Loop Finger: it avoids the Chicken Loop to slip out of the harness hook.
- Emergency line ring connector: it provides the connection for the kite leash to the emergency line.
- Quick Release: the mechanism that can be activated by pushing or pulling it and will instantly cut the power from the kite by opening or dethatching the Chicken Loop from the depower line. It will leave the kiter connected to the emergency line only (the only line holding the tension), while the bar slides towards the kite leaving the rest of the lines loose (you can see that here).
- Emergency line: it connects the kite leash to a front line (4-line bars) or to the fifth line (5-line bars), to achieve the kite’s full depower by foiling it.
- Lines Winding Posts: the end of the steering bar with a shaped concavity to orderly wrap the lines when not in use.
- Floaters: soft rubber or foam elements that keep the bar floating and protect the rider from directly being in touch with the lines, when in tension.
- The depower mainline: connects the rider to the front lines and allows the bar to slide along it. This gives the possibility to change of angle of attack of the kite, by adjusting the ratio between the length of the front and back lines.
- The Pre-line: normally a rubber or plastic pipe that lets the line be taken with better comfort during the kite launch from the water, preventing the kiter from directly touching the line and getting injured by sudden tensions on it.
- The color-coded Kite Control Bar: lets the rider steer the kite in the desired direction and power-depower the kite according to its position along the depower mainline. The color code helps to know where the left hand should be positioned, very useful after complex tricks or after losing the grab from the bar.
- The Stopper Ball: it lets the rider adjust to a minimum power level when the bar is not held in the hands (his element might not be present on all kitesurf bars).
- The Depower Trim Adjustment: it is used to adjust the power of the kite. Similar to the movement of the kite bar along the depower line, it changes the length ratio between the front and back lines, affecting the kite’s angle of attack on the wind.
This device provides a fixed adjustment to match the wind conditions to avoid extreme positions of the bar along the depower line. It helps to minimize or maximize the kite power according to the needs.
- The Back Lines: they are attached close to the tips of the kite and are responsible for the direction and depower changes.
- The Y Connector: it connects the front lines to the main depower line. It can vary in its position from very close to the depower trim to very close to the kite, the two cases are referred to as low Y and high Y line setup.
This depends on the kite design and shape and it is mostly a choice of a single kite brand.
- The Front Lines: they normally take a bigger part of the load from the kite and they tend to be the ones more subject to elongation after long periods of use or excessive tensions. The ratio between them and the back lines needs to be checked to assure the correct kite trimming.
Safety systems for kitesurfing
Release the bar
The first and easiest way to solve any problem when kiting is to let go of the bar.
What happens when we release the bar?
If we release the bar, our kite will lose power and fall into the water. However, we can often take control again before the kite hits the water.
When should the bar be released?
Releasing the bar can be helpful in the event of a kite crash, when wind speeds are too high, or when you sense an impending dangerous situation. In particular, if your kite crashes into the water, it’s crucial to let go of the bar to avoid being pulled along by the kite.
In most cases, you can simply let go of the bar to fix the problem.
Activate the quick release
The second safety system is the chicken loop. If you don’t have 100% control of the situation, you can release the chicken loop and the bar will go away from you.
What happens when we activate the quick release?
The kite will only be pulled by one line, so it will automatically fall to the ground and lose all its power.
If you find yourself in this situation, you will still be safely attached to the kite via the leash connected to the bar.
When should we use the quick release?
If you’re no longer holding onto the bar but the kite is still pulling you, or if you don’t feel safe, it may be time to use the quick release. This second safety system is often used when the wind suddenly gets stronger, or when the kite starts looping out of control.
The majority of the time, we will be able to solve the problem using options 1 and 2. However, today’s kites are considerably safer and come with a third safety system.
Activate the safety leash
The third and final safety system is releasing the safety leash, though this should only be used as a last resort.
What happens when releasing the safety leash?
You are no longer tethered to the kite, so you can let it go.
Why is it the last option?
The safety system should be used as a last resort because if the kite is not handled properly, it can become a hazard to others. If the kite is not properly secured, it can fly away and hit someone on the beach, get tangled in the lines, and be dragged by them.
If there is no one on the beach, the kite will find another obstacle and will break.
When to use this system, then?
If none of the above systems work, your last safety option is to activate the safety leash which is attached to your harness. For example, if you are kiting and a motor boat passes and your lines get tangled on it, you should release the leash and let the kite go.
If your lines get tangled with another kite, just try to solve the situation by using options 1 and 2.
It’s important to know how a kite’s safety system works before using it, especially if you’re renting or borrowing one.
The two added levels of safety
There are five levels of safety in kitesurfing that some instructors and kite school standards now refer to. They are not directly related to the kite bar, but it is worth mentioning them.
- The first is the safety kitesurf hook knife (you can read in detail here). Yes, another option, is to cut the kite lines, especially if you got tangled in between them and the lines are in tension and the kite is out of control.
- The second is to release the harness directly. This might sound odd, and the only situation that seems applicable is when you can’t use any of the systems before and you are completely out of control.
An example could be when you are surfing big wavers and you get caught in the washing machine and you can only feel your harness to get out of kite tension, but it seems more theoretical than realistic. If anyone has a better example, please write it in the comments below.
The bar quick release system is based on the principle of a tensioned spring. When the bar is released, the tensioned spring pulls the bar back, closing the gap between the bar and the frame.